Before relegating that empty plastic milk jug to the recycling bin, consider transforming it into the centerpiece of your personal seed-starting enterprise. Welcome to the inventive realm of milk jug greenhouses, where each carton becomes a cradle for the plants that will bring birds, bees, and other pollinators to your yard.
Many native plants grown from seed do better when seeds are overwintered outside or “stratified” in a refrigerator. This mimics the natural cycle of winter, employing a mechanism that plants have evolved in part to avoid sprouting in the height of growing seasons.
So why wait until spring to germinate and grow seeds when you can winter sow and get the benefits of both cold weather exposure and hardy seedlings? Follow our suggestions below to learn how to transform an ordinary milk jug into a haven for seedlings, perfect for gardeners eager to get a jump on growing season. This guide offers step-by-step instructions on setting up your “milk jug greenhouse,” ensuring your plants are toughened up and thriving by the time the transplanting season rolls around.
Key Takeaways
- Milk jug winter sowing offers an affordable and simple way to start seeds early out of doors, leading to hardy plants that are well-adjusted to typical weather conditions.
- The optimal condition for seed germination in milk jug greenhouses relies on creating a warm, moist, and well-lit microclimate that can be started during the winter months for certain plant varieties.
- Winter sowing seeds in milk jugs requires some monitoring and perhaps watering, but they enable a gradual transition (hardening off) to true outdoor conditions before final transplant, ensuring healthy and robust plant growth.
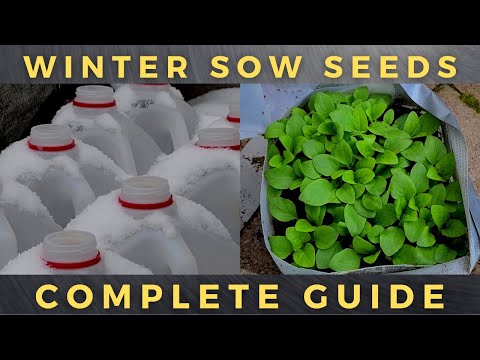
The Magic of Milk Jug Greenhouses

This unique and pain-free method for converting a plastic milk container into a productive greenhouse was popularized by Trudi Davidoff, who wanted to make gardening more accessible and sustainable. The technique harnesses the power of nature with the resourcefulness of recycling containers to kickstart the growing season.
The other big advantage of utilizing this winter sowing method is the early access to sturdy plants ready for transplanting as summer approaches. These winter sown plants will have already acclimated adequately during their outdoor exposure period, ensuring minimal shock upon transplantation when the outdoor temperatures rise.
Moving your seedlings from their repurposed homes to the actual outdoor landscape is also quite simple: simply separate the seedlings by hand or with the aid of a fork or knife and soft-handing them into larger containers or directly into the earth. The jugs can be saved and re-used the following winter.
The Science Behind the Milk Jug Greenhouse
By sowing seeds in soil inside translucent plastic jugs, the milk jug method effectively creates mini greenhouses that moderate temperatures and allow more light and warmth while protecting seeds from squirrels, birds and other winter scavengers. By trapping sunlight and heat, these jugs create a microclimate that mimics natural winter conditions and is perfect for seed germination. The trapped warmth and light also speed up seed growth, allowing them to sprout weeks ahead compared to direct sowing in soil.
Choosing the Right Seeds for Your Milk Jug Greenhouses
Almost any seeds from native plants can be sown using the plastic jug technique. This is because most native seeds require or benefit from cold stratification, a process where they need exposure to cooler temps and moisture before germinating. For those native species that absolutely require stratification, the method is an excellent alternative to putting moistened seeds in a refrigerator, another common method.
But you can also use your winter sowing milk jugs to start non-native vegetables, including lettuces, spinach, kale, Swiss chard, radishes, carrots, peas, broccoli, cabbage, and cauliflower. These plants will have a higher chance of success if planted using milk jugs during winter, and have a head start on growing.
Creating Your Own Milk Jug Greenhouse: A Step-by-Step Guide
Before diving in to building a milk jug greenhouse, it’s a good idea to gather all necessary supplies. These include:
- plastic milk jugs
- scissors, knife or utility knife for cutting the milk jug and creating the “lid”
- duct tape or other weather-proof adhesive tape (masking or painters tape doesn’t hold up well winter weather)
- potting soil or your preferred local soil mix
- an indelible or wax marker to identify the seeds in each jug
- a knife, screwdriver or drill to put a few holes in the milk jug bottoms
Once you have collected your materials, preparing the jug themselves is the next step. This involves simply adding a couple of drops of dishwashing liquid to some water in the jug, giving a few good shakes, and rinsing them thoroughly. Next create 4-6 1/4- to 1/2-inch drainage holes in your clean milk jugs to prevent water from standing in the bottom, and to allow bottom-up watering from a tray if you plan to do that. Tip: make your holes before cutting the jugs to create the lid, as having the more rigid jugs makes this easier. Toss the jug lids since you won’t be using them.
The next step is cutting the jug with your implement of choice. Leaving the “lid” connected for about two inches below the handle, cut horizontally the rest of the way around the jug about halfway up from the bottom. This leaves a nice hinge that also ensures that you can pick up and move the jug without fear of it coming apart.
How to Sow Seeds Your Milk Jug Greenhouse
Now it’s time to get started on the fun part – planting your seeds! First, the bottom of the jug with your preferred local soil or potting mix up to about 1/2 inch from the top.
Then follow the advice for your specific seeds to determine depth and technique. Next, water the soil lightly but thoroughly. A watering can with a gentle spray pattern or a pump sprayer both work well for this. After that step is done, seal up the milk jugs by taping them closed with duct tape. This will create a mini greenhouse effect perfect for helping germinate your seeds. Remember: don’t put the lids on!
One last important step is labelling each jug so you can keep track of what plants are growing inside.
When to Begin Winter Sowing
The chances of success of your milk jug greenhouse garden can be improved by ensuring that you sow the seeds early enough in the winter for the seeds to experience at least one or two cold cycles to break dormancy by early spring. To be safe, this usually means you should start winter sowing in your milk jugs after the winter solstice and be finished by early January, though you can start as late as February or March if you’ve had a late winter or tend have late springs with frosts into April or May. Your sowing date can be earlier if you are see an early, steady drop in temps; just keep an eye your milk jugs and move them to a cooler location if it warms back up.
Remember, all native plants are unique in they way they reproduce, so be sure to take into account the species that are on your winter sowing seed list as well as the local climate before deciding the optimal time for starting your winter sowing. Learn about each native plant, when and how they normally distribute their seeds, and when they typically germinate in nature–those details should be your guide to when to start seeds.
Finding the Perfect Spot for Your Mini Greenhouses
Proper placement of your milk jugs is also essential, and it may take a little experimentation. But start by placing your milk jug greenhouses where they can receive partial sunlight. Leaving them exposed to full sun all day long could dry them out quickly or cause premature germination, especially during a mild winter.
The perfect spot to winter sow seeds might have access to 4-6 hours of direct sunlight every day. East-facing locations are ideal as they offer morning sun and afternoon shade, ensuring that the plants receive just the right amount of light. It is important to choose a location where rainwater can easily reach the greenhouse, so you don’t have to constantly water your seedlings.
It is crucial to also consider wind when choosing a location for your milk jug greenhouse. Strong winds can cause damage the jugs and germinating seeds by toppling over the structure. Gusts could even blow the jugs apart. It’s best to find an area that is sheltered from high winds, but if not possible, securing the greenhouses with rocks or stakes will prevent them from being blown away. By finding a suitable spot for your greenhouses, you ensure an optimal environment for seed growth and development.
Caring for Your Milk Jug Greenhouse Seedlings
Even before germination, it is crucial to pay careful attention to the state of your little greenhouses.
Monitoring Moisture
Keeping the soil moist, then allowing it to dry for brief periods, replicates the natural cycle that helps seeds germinate. So check your milk jugs at least once a week, and if the jugs feel light and dried out, it’s time add water. Continue watering them after the sprouts begin to show if the soil seems dry, especially if you are having a dry winter or are not experiencing the cold temperatures you expected. Depending on your local weather patterns, you might need to lightly water every few weeks, or not at all. The temperature and moisture levels inside the milk jug greenhouse play a significant role in promoting the health and development of your seedlings.
Using a gentle watering technique through the top opening of the jug, but be mindful not to splash or flood the soil as this can disturb a growing seed. Remember that balance is key, keeping just enough moisture without over-saturating the soil. High quality potting soil is usually very good at retaining moisture.
Also keep in mind that early germination is also a possibility if you experience extended warm spells. To prevent this from happening, you can remove the lids from the greenhouses when temperatures go above 65 degrees or so. But be sure the lids are back in place as temps drop; you don’t want the seeds or sprouts exposed to frost or freezing temperatures.
Hardening Off and Transplanting Seedlings
Gradual exposure to outdoor conditions by leaving your jug lids open will help with hardening off and typically takes 7-14 days.
After completing the hardening off process, it’s time to transplant seedlings into your garden. This procedure involves ensuring the soil is slightly moist, carefully removing the seedlings and separating them with as little trauma to the roots as possible, and gently covering their roots with soil or potting mix and watering. First-time transplanters often feel some trepidation about separating seedlings and roots, but as long as you keep most of the root structure intact, and dig a hole that is more or less as deep and wide as the roots were in the milk jugs, the plants should do fine.
Overcoming Germination Challenges
Even with our best efforts, it’s not uncommon for seeds to refuse to germinate. But don’t get discouraged! There are solutions to troubleshoot this issue. By ensuring the proper levels of soil moisture and temperature, you can eliminate most germination issues, but perfect cold stratification is never 100%, and there is always variation on timing and success even within the seeds you have collected or purchased. That’s nature’s way after all!
Take into consideration the specific type of seed you’re using. Some have a tougher outer layer that may need light scratching (scarification) in order for germination to occur successfully. The dormancy period might also be an obstacle for some seeds. Some species may require two or even three deep freezes before their dormancy is broken, while others need only one. Some species also do better with more or less water, depending on the nature of the plant.
Think of each sowing season and the results of your efforts to start seeds as an adventure that helps you understand more about and appreciate the differences between all the plants you’re growing
Expanding Your Milk Jug Greenhouse Garden

Once you have a good understanding of winter sowing in milk jugs works, there is no need to limit yourself to a single technique. You can use a variety of methods and containers as an alternative to sowing seeds indoors.
One option is to buy plastic base and dome units manufactured specifically for holding seed starter trays. These have a couple of advantages and a couple of disadvantages. The advantages include making it easier to organize different types of plants in the larger layouts, having a seed sowing system that looks neater, and having a better view of the progress of germination. Disadvantages include typically having to water more often, and the fact that the smaller containers make separating seedlings a little harder.
Plastic salad containers, rotisserie chicken containers, water bottles, or even egg cartons can also serve as great alternatives for creating makeshift winter sowing containers and greenhouses. Just remember to poke drainage holes as well as holes in the lids of whatever container you choose. When it comes to repurposing household items to winter sow perennials, annuals, or even larger plants, let your creativity be your guide.
After sowing season remember to strip off old tape, and rinse all the jugs and let them dry before storing.
Summary
To sum up, utilizing milk jugs as mini greenhouses for winter sowing is a budget-friendly and unique approach to kickstarting your gardening season. There are various steps involved, such as cutting and adapting the jugs, then placing them correctly and tending to the seedlings, and troubleshooting common issues that may arise along the way. With patience and proper care, you will be rewarded with sturdy seedlings ready to thrive in your garden. So gather those empty milk jugs and let’s begin your journey of winter sowing!
Frequently Asked Questions
Is it true that you can use a milk jug to sow seeds?
Yes, it’s one of the easiest and most effective ways to germinate seeds for your native plant garden and works great for winter sowing vegetables too. One can effectively use a milk jug as a mini greenhouse to successfully sprout seeds for different types of plants, taking advantage of the sun’s natural light to give a head start to your summer garden. Give this method a go and observe the results for yourself!
Will milk jugs protect plants from frost and snow?
Milk jugs have the ability to safeguard plants from frost and snow by acting as protective shields. They effectively trap warmth and create a barrier against freezing temperatures during the night, thus shielding plants from any potential damage. But don’t expect milk jugs to protect new seedlings from severe cold; if your seedlings sprout too early because of an extended warm spell, you might have to move them into a garage or other more protected area until the danger of a late hard freeze is past. Be sure to note the last frost date for your region.
How do you make a greenhouse out of milk bottles?
Transforming plastic milk jugs to winter sow seeds is a simple and innovative way to reuse them for gardening. With just a few steps, you can easily create your own mini greenhouse from items that might otherwise have been discarded, and you can re-use the jugs season after season.
To start, drill some drainage holes in the bottom of the jug. Then cut it in half, leaving the plastic connected just below the handle to serve as a hinge. Next, add potting soil to the lower half of the jug. This provides an ideal environment for planting seeds or small plants inside the makeshift greenhouse. Water gently but thoroughly, then tape the jug closed with duct tape to ensure you create your mini greenhouse environment.
What can I do if my seeds are not germinating?
First, remember that typically not all seeds will germinate no matter how successful your techniques. Sometimes, particularly with hard-to-germinate species, you can try over-sowing the seeds to ensure that you achieve some success. Professional plant propagators sometimes use a variety of techniques to increase the odds of germination for specific species: soaking, pre-germinating, scarification (to break the hard outer coat), using a fungicide or soaking in a seed-starting medium, or even heating seeds in an oven are common techniques. (For an idea of how much details can matter, take a look at this guide to seed germination from the Alplains.com. It includes lists of specific genera that need no special treatment to germinate, and those that need cold stratification or scarification.)
But for the average person who wants to beautify and welcome biodiversity into their yards, we recommend going with simpler options first. Thankfully native plants are very forgiving if you simply mimic their patterns of seed sowing. If you set up your milk jug winter sowing containers well and start seeds with even the most casual attention to their care, you’re likely to have plenty of seedling growth and some happy additions to your garden come spring.
